[vc_row][vc_column][vc_column_text]Demat and Trading accounts are opened together with Zerodha. In this guide, we’ll look into the exact steps to open a demat and trading account with zerodha.
You can complete the account opening process with Zerodha by using your Laptop or Smartphone or Computer (Web Camera should be available). Here’s is the Online Account opening link:  Besides, if you face any difficulties while opening an account online, you could contact @ 953 803 7242.
Quick NOTE: Please enter your information correctly so that you avoid filling the forms again.
[/vc_column_text][vc_single_image image=”15723″ img_size=”large” alignment=”center” onclick=”custom_link” link=”https://tradebrains.in/get/zerodha/”][/vc_column][/vc_row][vc_row][vc_column][vc_custom_heading text=”Documents Required to Open Zerodha Demat Account”][vc_toggle title=”Documents required for account opening online are listed below:”]
- Bank Account Proof: (Bank passbook front page photo/ Scan copy or online statement or cancelled cheque. [If you are submitting cancelled, Your name should be PRINTED ON IT, then only it’s accepted])
- PAN CARD (Card not valid without sign, screenshot here).
- AADHAR Card with linked mobile number.
- Signature (Photo or Scan copy).
- Proof of Income (If you wish to trade in F&O or commodity it’s required) and acceptable documents are recent salary slip or last six months bank statement or ITR.
Note: You should have the email address as well which will be required while filling the application.[/vc_toggle][/vc_column][/vc_row][vc_row][vc_column][vc_custom_heading text=”Steps to Open Zerodha Demat Account Online”][vc_toggle title=”STEP 1: Click on this link to sign-up and start the account opening process”]Go to the Zerodha account opening page on your browser. Here’s the direct link to start the account opening process:

Once you click on the above link, Zerodha’s account opening page will appear as shown below.
 [/vc_toggle][vc_toggle title=”STEP 2: Enter your mobile number and Verify OTP to Sign-up”]Enter your mobile number to Sign-up. You’ll receive an OTP to verify the mobile number.
The OTP will be valid to login for the next 30 mins. Please check your SMS and use the same OTP for your mobile number verification.
Quick Note: In this step, you can sign up with any mobile number that you prefer. However, you also need to have the Aadhar linked mobile number (that will be used in a later step for Aadhar based OTP verification process). Only then you’ll be able to complete the online account opening process.
 [/vc_toggle][vc_toggle title=”STEP 3: Enter your PANCARD and Date of Birth Details”]Next, enter your PAN Card number along with date of birth (D.O.B) details in the field provided. Make sure to enter these properly. Below is the screenshot for your reference.
 [/vc_toggle][vc_toggle title=”STEP 4: Make the payment for the Demat & Trading Account Opening Charges”]Now, you have to complete the account opening payment which is a one-time investment.
For equity– you’ve to pay Rs 200 and for commodity, the charge is Rs 100. (Commodity account is optional. If you wish to trade in the commodity, you can make this payment, else you can enable it later.)
You can complete the payment through UPI or Net-banking/Card payment (recommended). Below is the screenshot of this step for your reference.
 [/vc_toggle][vc_toggle title=”STEP 5: Connect your Aadhar Details via ‘Digilocker'”]After completing the payment, the next step is to connect your Aadhar details via Digilocker.
DigiLocker is a government initiative to share your aadhar details and highly secured. You need to create a ‘DigiLocker: Towards Paperless Governance’ account and link your Aadhar with it.
Below is the screenshot for your reference. Click on ‘Connect to DigiLocker’ and this will open a new page to sign up to Digilocker using your phone number. If you already have an account, click on ‘Sign in’ option in the bottom.
While connecting the Digilocker, you will be receiving the OTP to your AADHAR linked mobile number for your information. Once you get the OTP, enter it and hit continue. (Note: If you don’t have the security PIN, then click on the forgot my PIN and reset it.)
Next, click on allow so that you can share a copy of your Aadhar to Zerodha. Finally, your Aadhar details will appear on the screen. Make sure you are entering the details correctly. Note: This step will only come if you haven’t done KYC earlier.
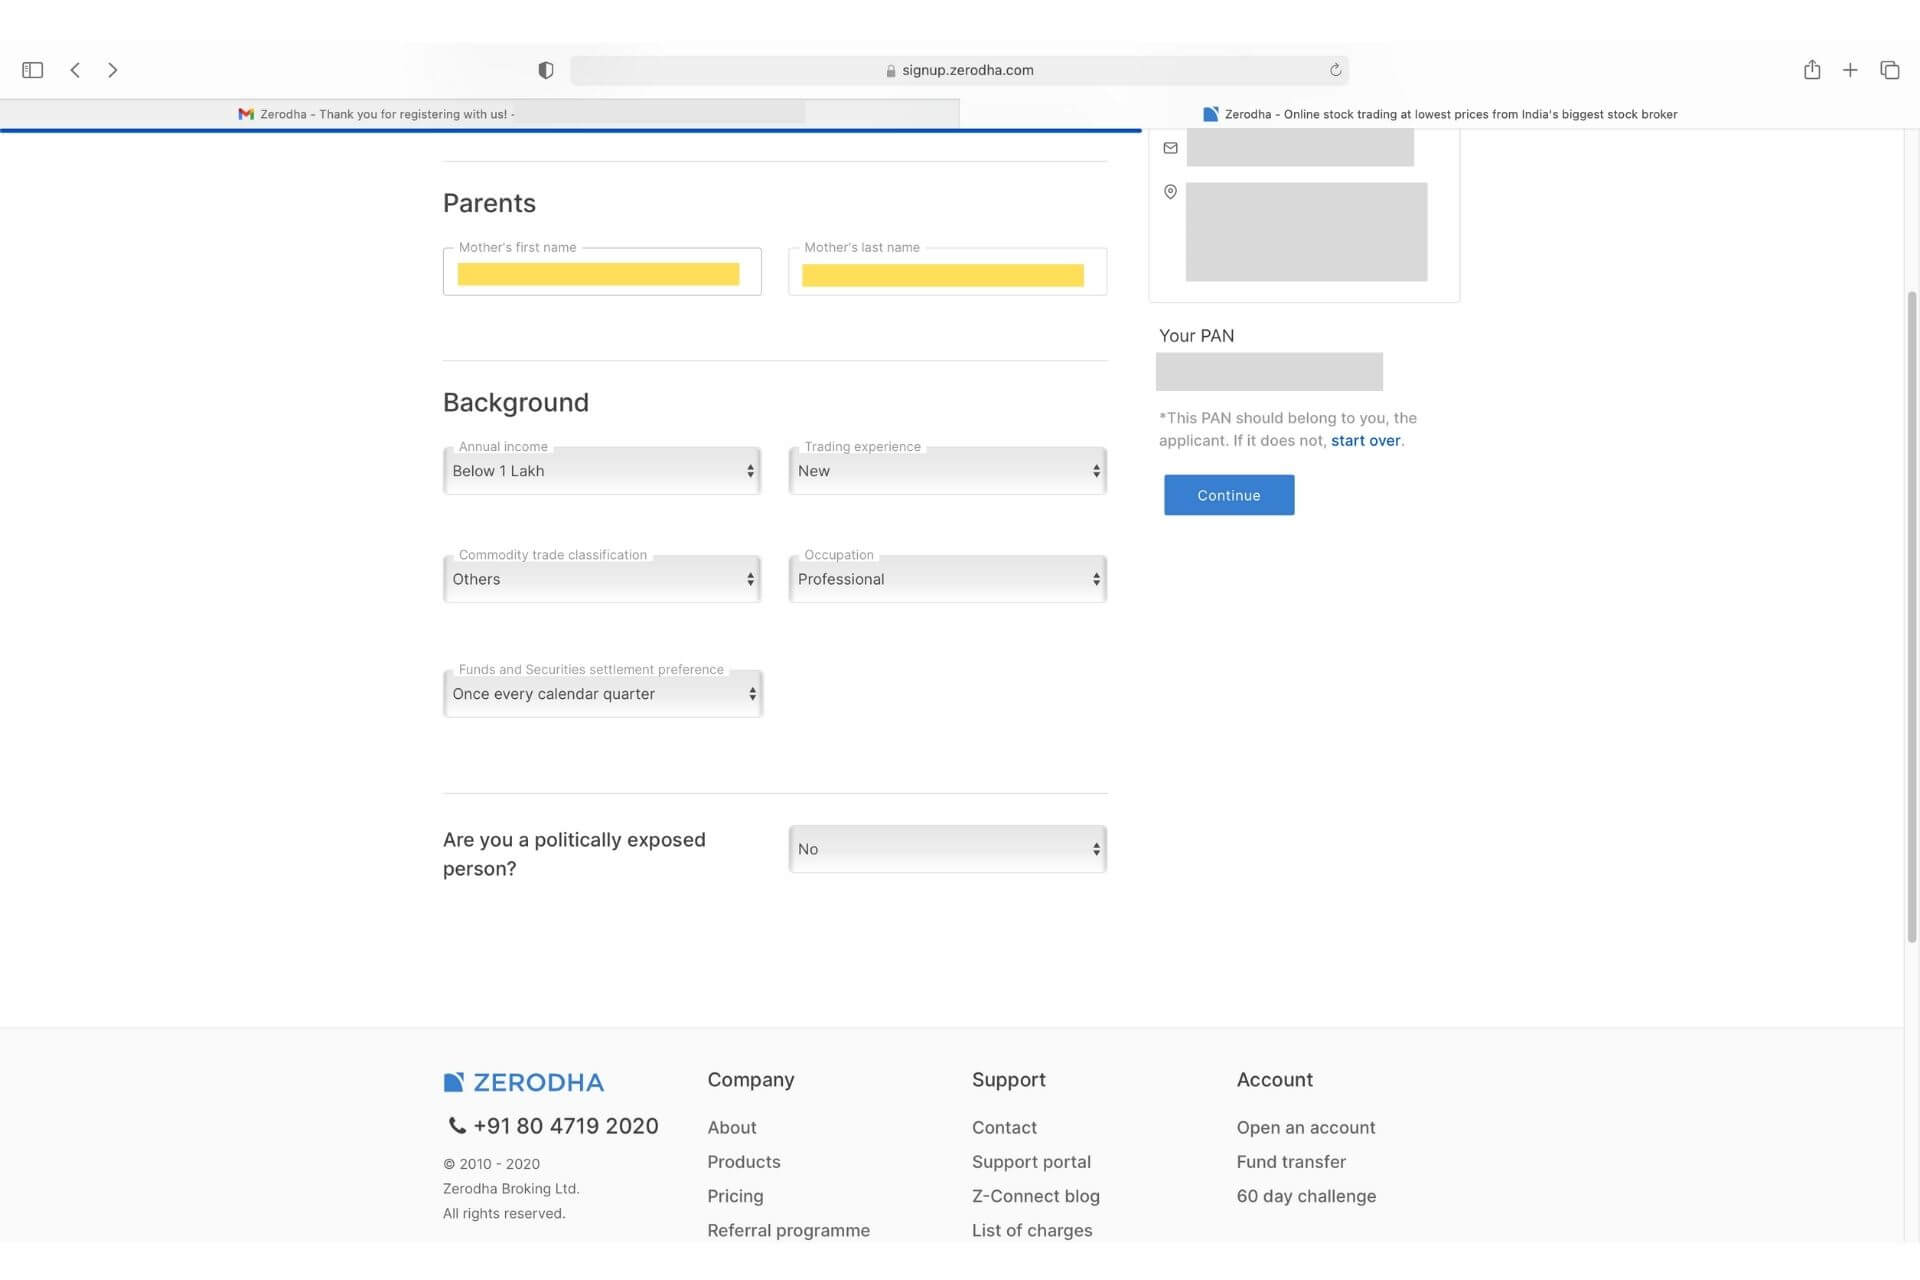
 [/vc_toggle][vc_toggle title=”STEP 6: Enter Your Personal Details like father’s name, mother’s name, occupation, etc”]Once your Aadhar verification is complete, next you need to enter your personal details like father’s name, mother’s name, your occupation, etc., Below is the Screenshot of this step for your reference. After entering the details, click ‘CONTINUE’
 [/vc_toggle][vc_toggle title=”STEP 7: Next, link your bank account with Zerodha by entering bank details”]Next, you need to Link Bank Account. Here, you need to fill up more details starting by filling up Bank Details i.e. your bank account number, bank name, branch’s IFSC Code & MICR code
Make sure you choose all the options (checkboxes) and after reading the information, hit on the continue button.
Note: Please cross verify the bank account details with bank passbook or cancelled cheque or online statement (soft or hard copies) to avoid re-processing the forms again. Here is the Screenshot of this step for your reference.
 [/vc_toggle][vc_toggle title=”STEP 8: Start the In-Person-Verification (IPV) using your webcam”]Next is IPV Verification over webcam/phone.
IPV or In-person-verification is a process where a depository participant in personal verifies documents and other details as per the law by SEBI. It is compulsory for every investor to go through the in-person verification process before opening a demat and trading account.
First, you’ve to allow the Camera on your browser/phone to start to IPV process (check the below screenshot). You should click on the Allow button. If you click on the Block button, the camera will be disabled, and you may not be able to enable it easily.
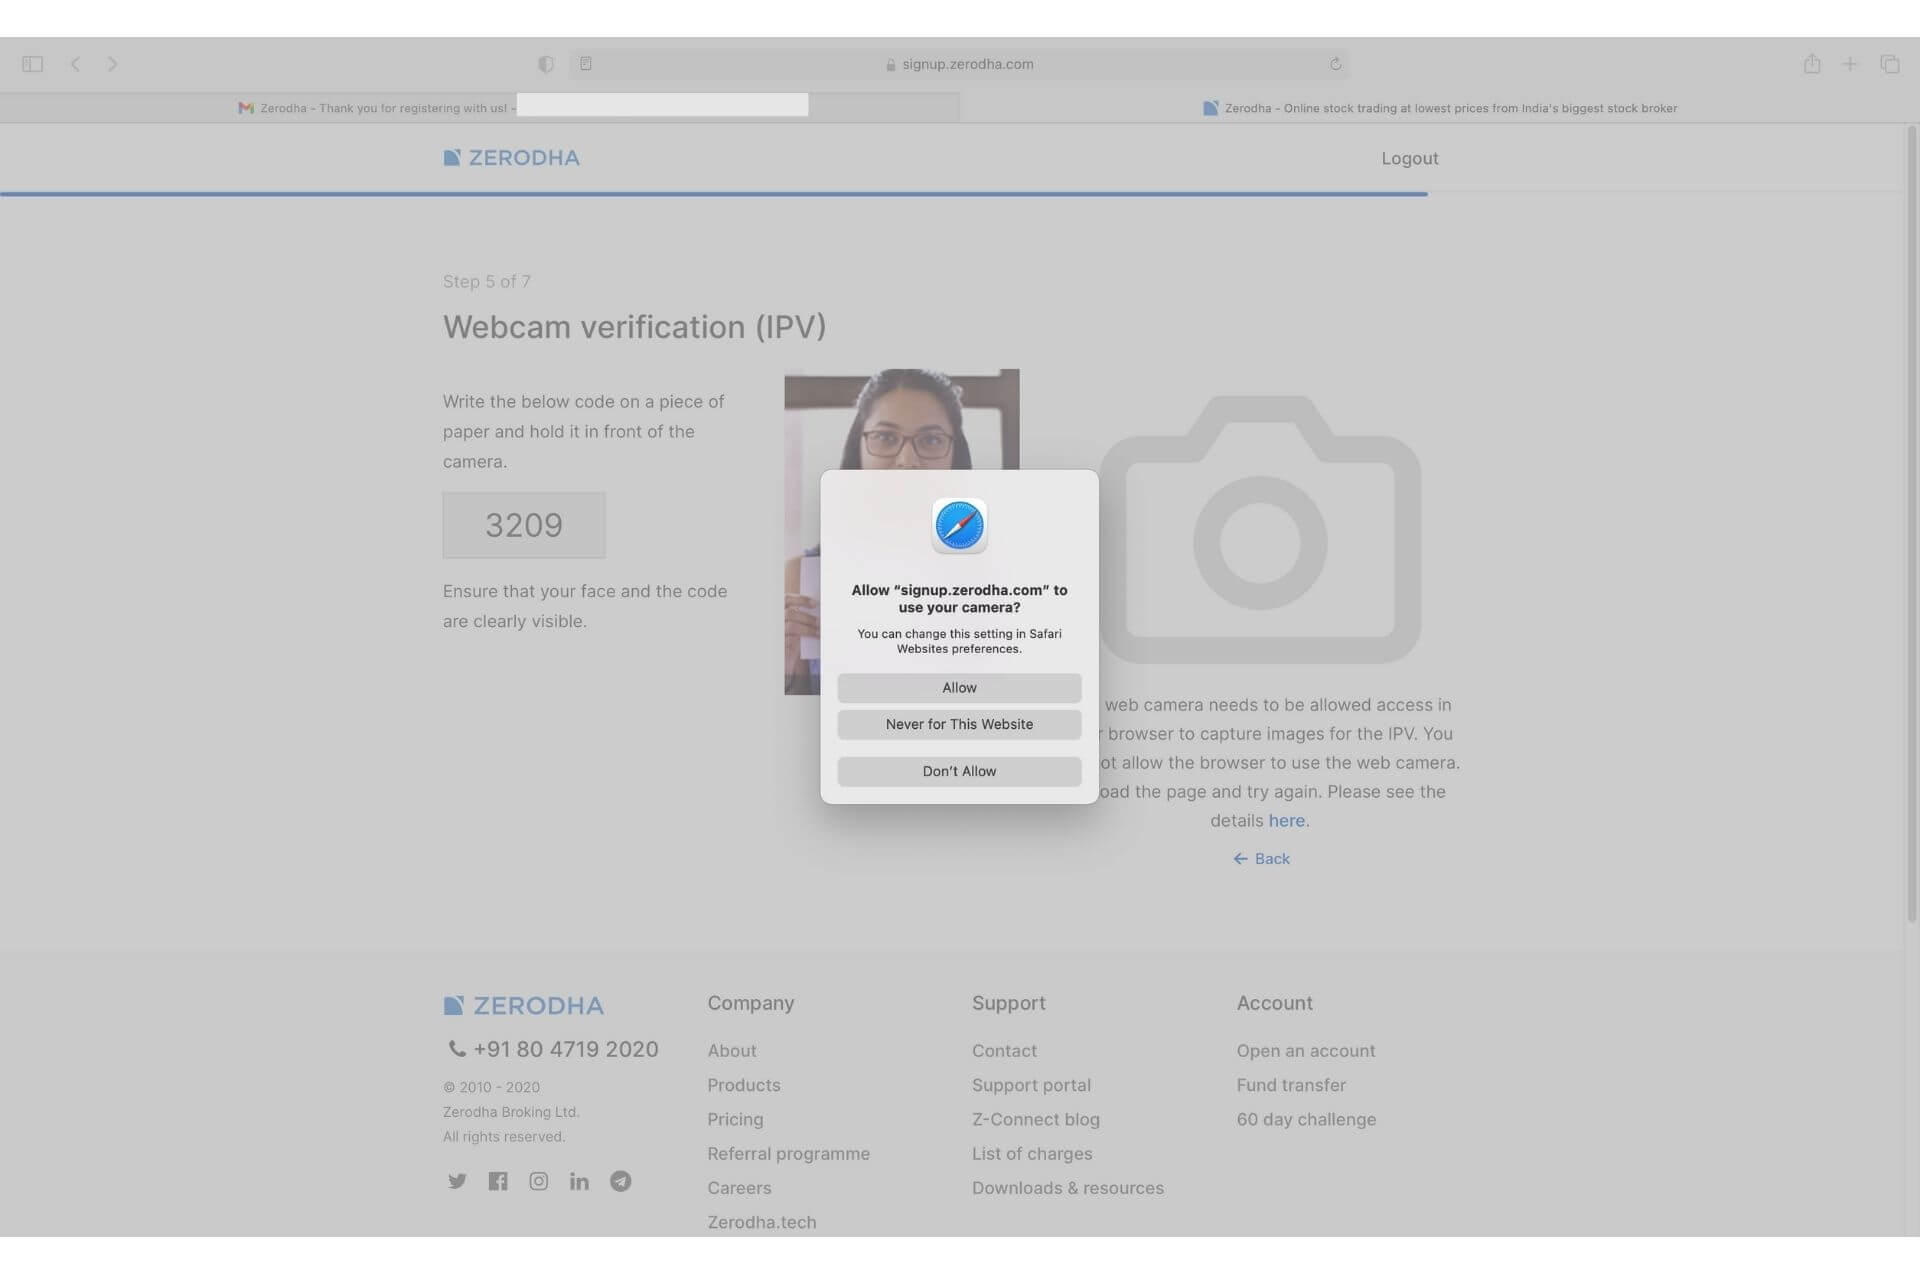 [/vc_toggle][vc_toggle title=”STEP 9: Complete the IPV Verification by taking a picture with OTP Number”]Next, they’ll display an OTP on the screen. You need to clearly write down this OTP shown on a piece of paper or your smartphone. Then, hold the piece of paper/ mobile phone with the code in front of your mobile phone/ webcam.
Make sure to take the correct photo while holding the OPT written on Paper. You can take reference of how the person takes the photo in the below screenshot. Finally, click on the capture button.
Note: While taking the photo please don’t move here and there until it gets captured and hold the paper (OTP written paper) in front of the camera.
 [/vc_toggle][vc_toggle title=”STEP 10: Upload your documents like Bank Details, PAN CARD, Signature and, Proof of Income(optional)”]In this step, you have to upload the relevant documents that we mentioned in the beginning. You have to upload documents like Bank Details, PAN CARD, Signature and, Proof of Income(optional).
Income Proof is optional & only required if you want to trade Futures & Options, currency, and commodity. Then click on continue. It will be redirected to the equity eSign page.
 [/vc_toggle][vc_toggle title=”STEP 11: Start the Equity eSign by clicking on eSign Button”]Next, it’s time to eSign. Click on ‘eSign Equity’ button and proceed to the next step.
Once you click on the eSign button, the following screen will appear.
 [/vc_toggle][vc_toggle title=”STEP 12: Verify your email by logging with either Gmail or other Email id”]Once you click on the eSign equity, you’ve to verify your email. Here, two options will be available i.e. Google login or email login.
If you’re going with an email login, please enter your email address correctly as you’ll again receive an OTP to verify your email id. This is the same email where you’ll receive all your future correspondence from Zerodha.
Enter the OTP that you’ve received on your registered email and verify.
 [/vc_toggle][vc_toggle title=”STEP 13: ‘SIGN Now’ by checking the form for eSign”]Once your email verification is complete, a new page with the “SIGN NOW” option will be opened. Here’s a screenshot for your reference. You should check the form.
Next, Click on the “Sign Now” button at the bottom of the page. It will redirect you to the NSDL page.
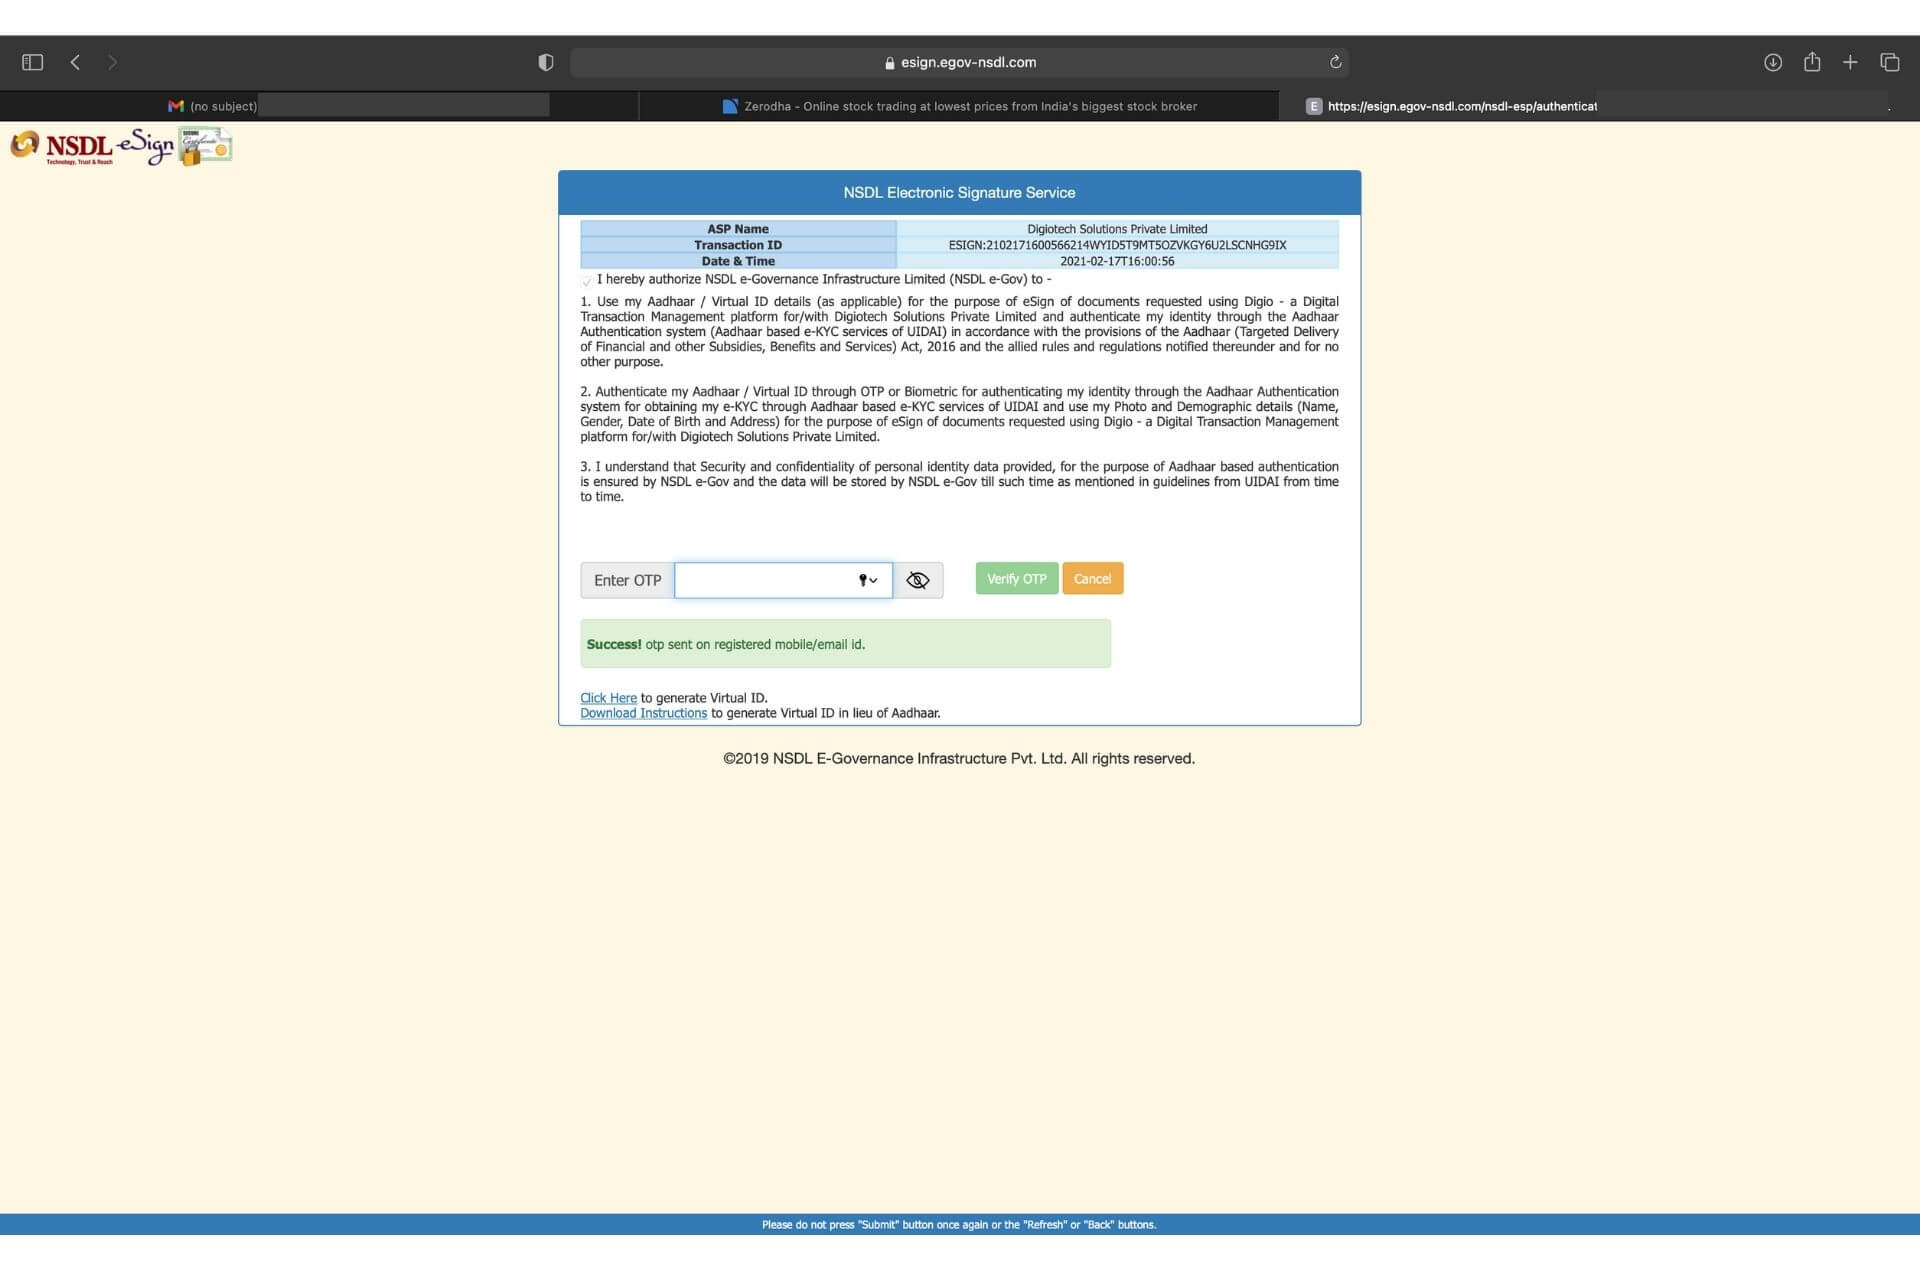
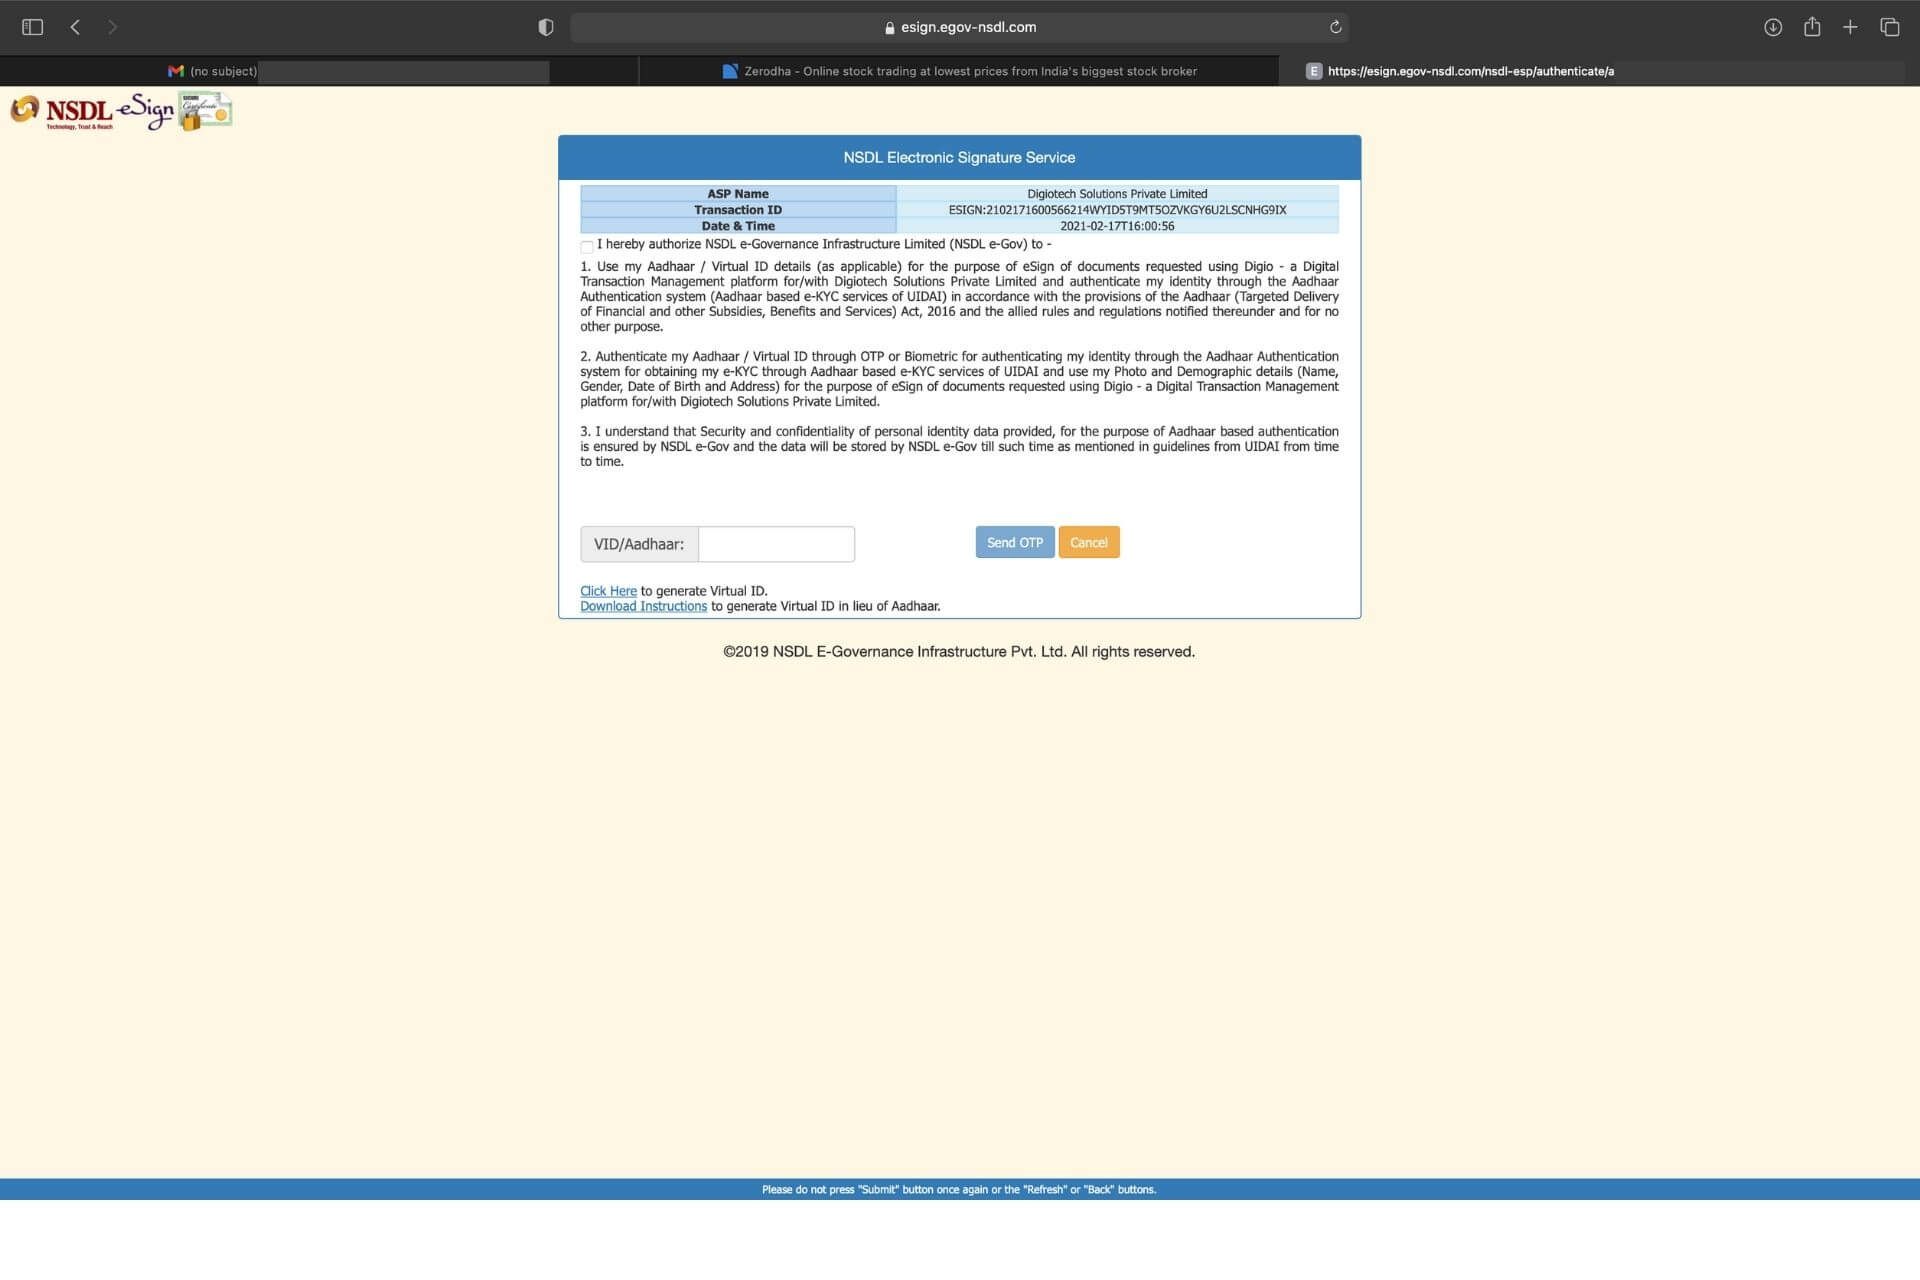
 [/vc_toggle][vc_toggle title=”STEP 14: Complete the Equity eSign Process on the redirected NSDL Page”]Once, you’re on the NSDL Page, Click on the check box top left stating “I hereby….”
Next, enter your AADHAR number at the bottom of the page and click on the Send OTP. Finally, enter the OTP and verify.
 [/vc_toggle][vc_toggle title=”STEP 15: Check for the green background screen to confirm your eSign”]Once last step is complete, and it’s verified, the entire page will become with green background and a message appearing as “You have successfully signed the document”. This is a confirmation that your esign process is complete for the equity segment.
 [/vc_toggle][vc_toggle title=”STEP 16: Your Equity eSign is complete. Download the eSigned Documents.”]Next, you will be able to see the tick mark on the Equity segment which means that you’ve successfully signed up for this segment. You will also be able to download the eSigned Document on this page.
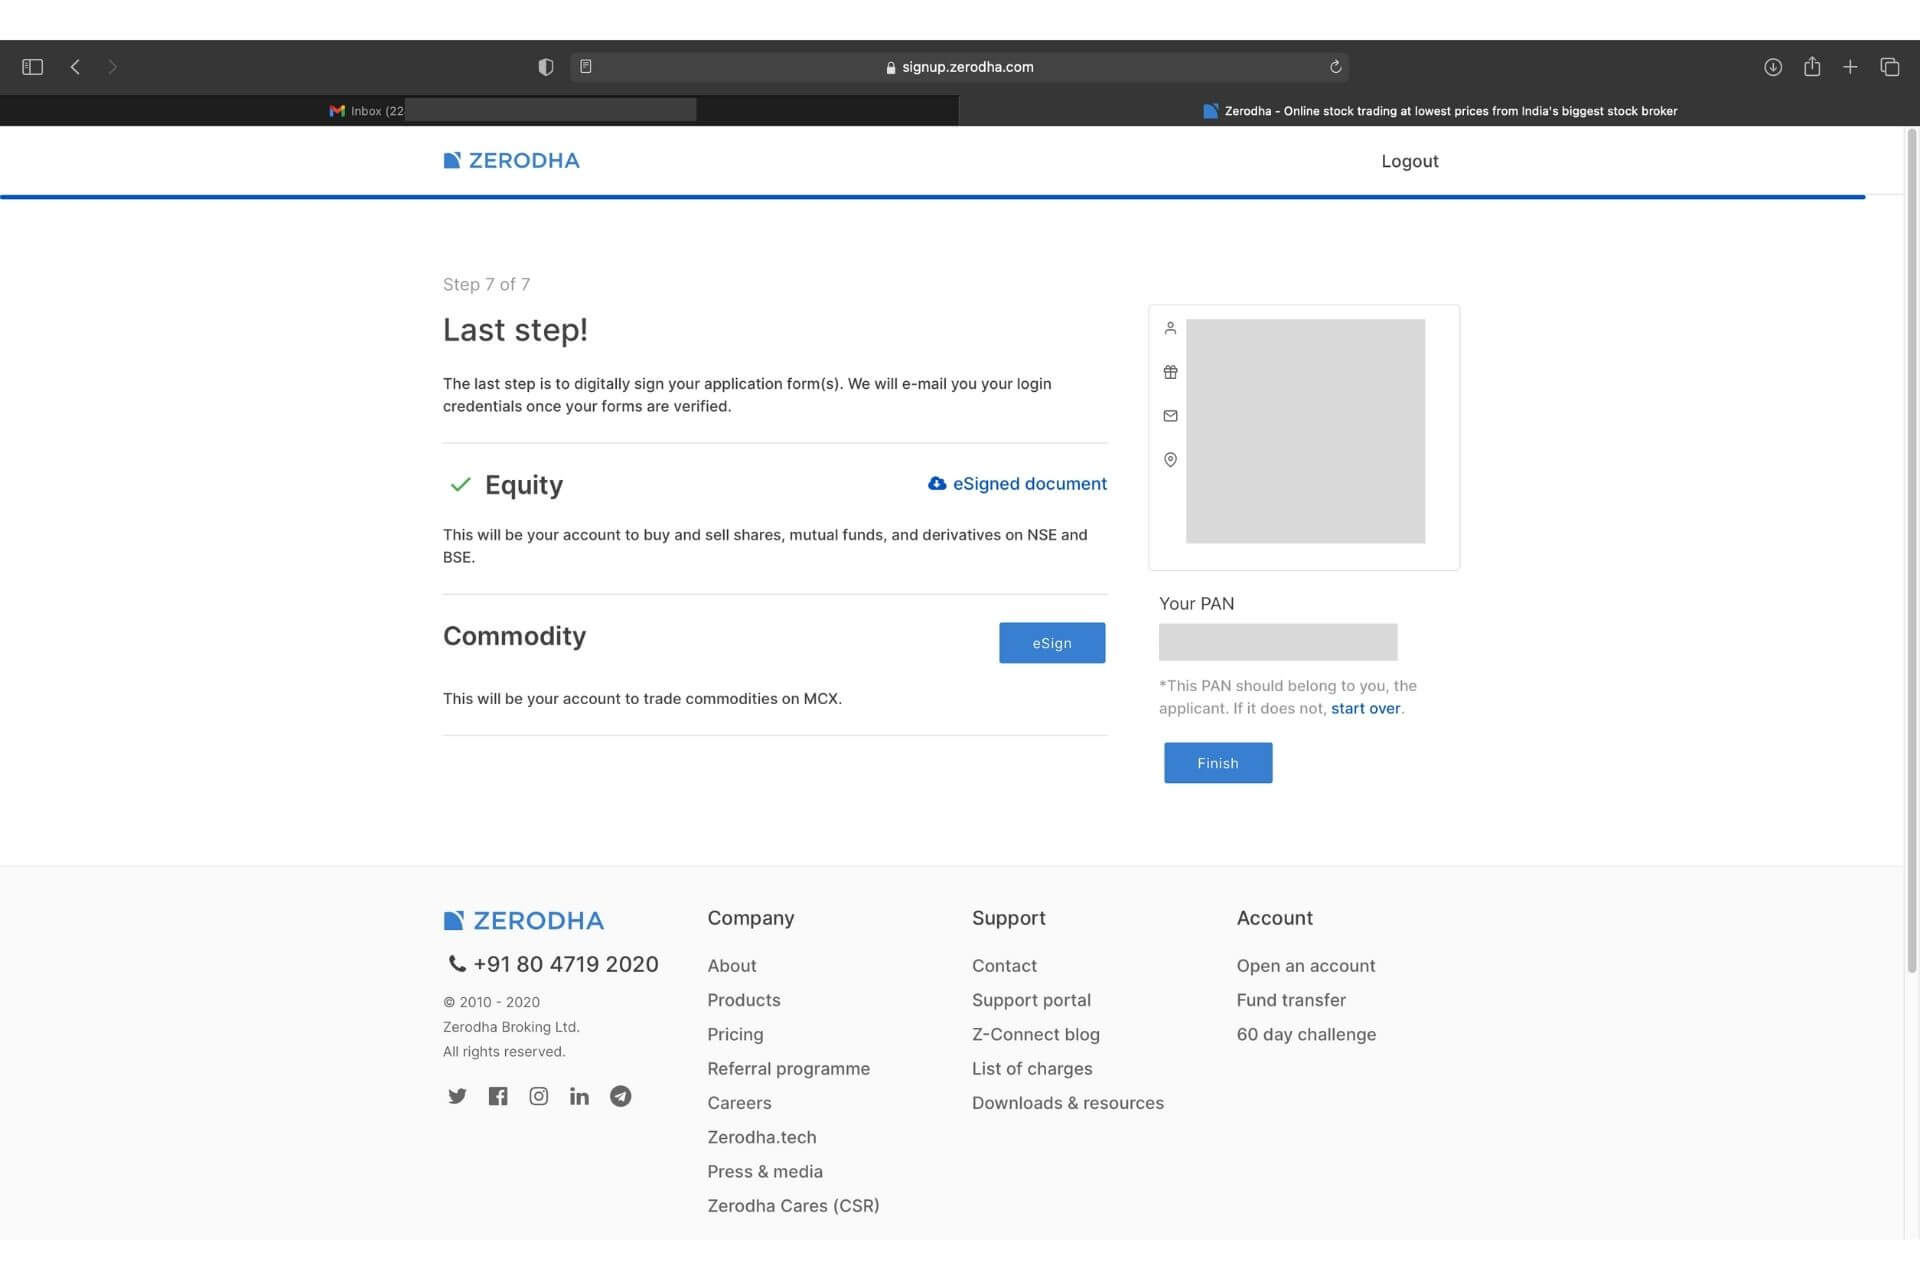 [/vc_toggle][vc_toggle title=”STEP 17: Repeat the eSign Process for the commodity segment (Ignore if not applied for commodity)”]This step is applicable only for those who want to enable the commodity segment on their account. Here, they have to eSign again for the commodity segment.
Click on the commodity eSign. It will redirect you to the NSDL page. Next, click on the check box on the top left corner and enter the aadhar number. You will receive an OTP to the AADHAR linked mobile number. Once you enter the OTP and it is verified, the documents will be eSigned for the commodity segment too.
 [/vc_toggle][vc_toggle title=”STEP 18: ‘Congratulations’ message will be displayed on Screen confirmed you’ve completed all the steps correctly”]Congratulations, you have completed all the steps. A final Congratulations message will appear on your screen, once you’ve completed all the previous steps. Here’s the screenshot for your reference.
 [/vc_toggle][/vc_column][/vc_row][vc_row][vc_column][vc_column_text]
Quick Note: Once you complete all the steps, then the Zerodha document verification team will verify your documents. Once it’s verified, then you will get an email from the document verification team stating your documents are successfully verified. After receiving this email, you will get the login credentials within 24 hours.
[/vc_column_text][/vc_column][/vc_row]

